

Building a Line Following BeagleBone Robot with openCV
Video:
Supplies:
-A BeagleBone running Debian and a USB cable.
-A way to view video from your BeagleBone. I recommend SSH'ing in with X.
-A Linux supported USB webcam. I used a Microsoft HD-3000, but I would recommend the Logitech c270.
-A robot base (preferably using two DC motors as it's drive base)
-A L293D Motor Driver Chip
-A 7805 Voltage Regulator
-A Breadboard
-A Power Switch
-A Power source over 7 volts (I used an 8 volt battery pack)
-Lots-o-wires
Connecting to your BeagleBone
Plug the BeagleBone into your computer with the USB cable. Start by getting access to the BeagleBone's terminal. I used SSH with X so that I can view video from the BeagleBone. Here is a tutorial on setting up your computer to use X with SSH.
your-computer:~ ssh -X root@192.168.7.2
Writing the Line Tracking Code:
Make a new directory:
bone# mkdir lineFollower
Now enter the directory:
bone# cd lineFollower
Now make and edit the python file:
bone/lineFollower# nano lineTracker.py
Paste this code into the editor [ctrl+shift+v]:
import numpy as np
import cv2
video_capture = cv2.VideoCapture(-1)
video_capture.set(3, 160)
video_capture.set(4, 120)
while(True):
# Capture the frames
ret, frame = video_capture.read()
# Crop the image
crop_img = frame[60:120, 0:160]
# Convert to grayscale
gray = cv2.cvtColor(crop_img, cv2.COLOR_BGR2GRAY)
# Gaussian blur
blur = cv2.GaussianBlur(gray,(5,5),0)
# Color thresholding
ret,thresh = cv2.threshold(blur,60,255,cv2.THRESH_BINARY_INV)
# Find the contours of the frame
contours,hierarchy = cv2.findContours(thresh.copy(), 1, cv2.CHAIN_APPROX_NONE)
# Find the biggest contour (if detected)
if len(contours) > 0:
c = max(contours, key=cv2.contourArea)
M = cv2.moments(c)
cx = int(M['m10']/M['m00'])
cy = int(M['m01']/M['m00'])
cv2.line(crop_img,(cx,0),(cx,720),(255,0,0),1)
cv2.line(crop_img,(0,cy),(1280,cy),(255,0,0),1)
cv2.drawContours(crop_img, contours, -1, (0,255,0), 1)
if cx >= 120:
print "Turn Left!"
if cx < 120 and cx > 50:
print "On Track!"
if cx <= 50:
print "Turn Right"
else:
print "I don't see the line"
#Display the resulting frame
cv2.imshow('frame',crop_img)
if cv2.waitKey(1) & 0xFF == ord('q'):
break
Next press [ctrl+x] to leave the nano editor. Then press y to answer "yes" and then hit the enter key to save the file.
Now you can run the program with:
bone# python lineTracker.py
Now face your camera at a white background, and wave a black object in front of the screen. It should show the largest black blob detected with it's center coordinates shown by two blue lines. In the terminal it should be outputting "Turn Left" if the image is too far to the right, or "Turn Right" if the image is too far to the left. It will print "On Track" If the line is near center, or "I don't see the line" if nothing is detected.
A part of the track the robot is following ->
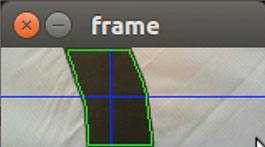
You can end the program by clicking on the video window and pressing the "q" key or by holding [ctrl+c].
How Does the Code Work?
Let's break it down:
Start with your imports:
import numpy as np
import cv2
Next setup the video feed:
video_capture = cv2.VideoCapture(-1)
video_capture.set(3, 160)
video_capture.set(4, 120)
The first line sets which camera is to be used. If you set it to -1, it will use a random camera, however if you have multiple cameras plugged in you can change the number to decide which one to be used. The second and third lines define the width and height of the video input. In this case, the video is 160x120 px.
Start the infinite loop:
while(True):
Now capture the current frame and crop it:
# Capture the frames
ret, frame = video_capture.read()
# Crop the image to the bottom half of the initial frame
crop_img = frame[60:120, 0:160]
The cropping is required so that the robot only looks at the part of the line closest to it, as opposed to a part of line that may be farther down the track.
Convert the image to grayscale and apply a Gaussian blur.
# Convert to grayscale
gray = cv2.cvtColor(crop_img, cv2.COLOR_BGR2GRAY)
# Gaussian blur
blur = cv2.GaussianBlur(gray,(5,5),0)
Since we are only looking at black lines on a white surface, we convert the image to grayscale. Next we apply a Gaussian blur to help eliminate any noise from the image.
Threshold the image:
# Color thresholding
ret,thresh = cv2.threshold(blur,60,255,cv2.THRESH_BINARY_INV)
What a color threshold will do is convert the image to a boolean image. Any pixel below 60 will become white, and any above that color will become black (In later stages, openCV will track the white pixels!).
Find the contours:
# Find the contours of the frame
contours,hierarchy = cv2.findContours(thresh.copy(), 1, cv2.CHAIN_APPROX_NONE)
We want openCV to detect all of the shapes we have thresholded for (the black line) so we can process them in the next steps. Since findContours() will edit the image that is inputed, we instead inputted a copy of the thresholded image (which we might need to view later for debugging purposes).
Find the center of the biggest contour:
# Find the biggest contour (if detected)
if len(contours) > 0:
c = max(contours, key=cv2.contourArea)
M = cv2.moments(c)
cx = int(M['m10']/M['m00'])
cy = int(M['m01']/M['m00'])
The first line checks to see if any contours are detected. If any contours are detected, it finds the one with the biggest area, and then finds the center X coordinate (cx) and Y coordinate (cy) of that contour.
Finally draw the contours and lines onto the initial cropped image:
cv2.line(crop_img,(cx,0),(cx,720),(255,0,0),1)
cv2.line(crop_img,(0,cy),(1280,cy),(255,0,0),1)
cv2.drawContours(crop_img, contours, -1, (0,255,0), 1)
Now the robot detects the positioning of the line and figures out which way to turn:
if cx >= 120:
print "Turn Left!"
if cx < 120 and cx > 50:
print "On Track!"
if cx <= 50:
print "Turn Right"
And if the robot sees nothing:
else:
print "I don't see the line"
Last but not least, display the resulting frame:
#Display the resulting frame
cv2.imshow('frame',crop_img)
if cv2.waitKey(1) & 0xFF == ord('q'):
break
Wiring the Robot:
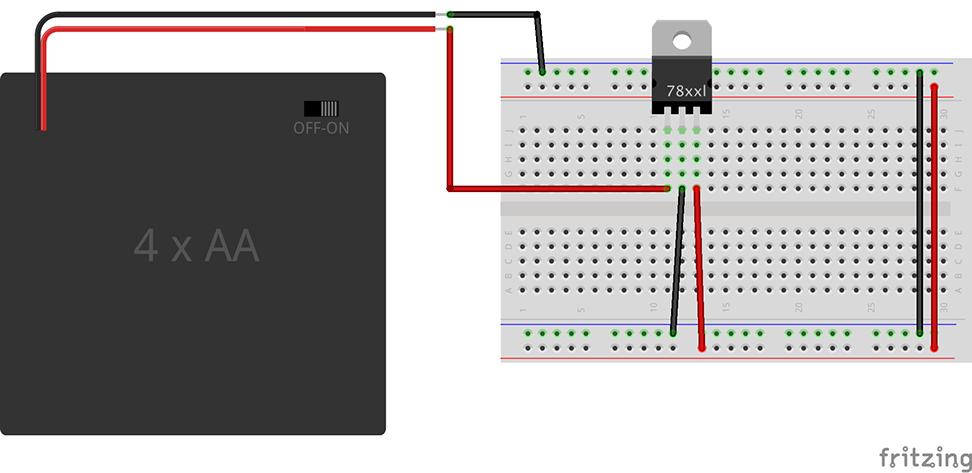
Start by setting up your power source. Use a 7805 voltage regulator to regulate the voltage to 5 volts:
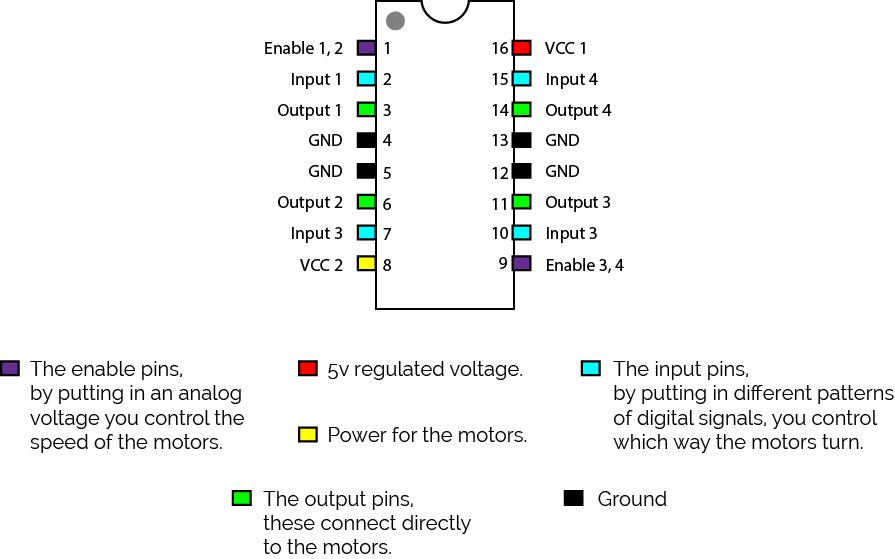
Our robot is going to use a L293D motor driver chip, here are some of the pinouts that stand out on the chip:
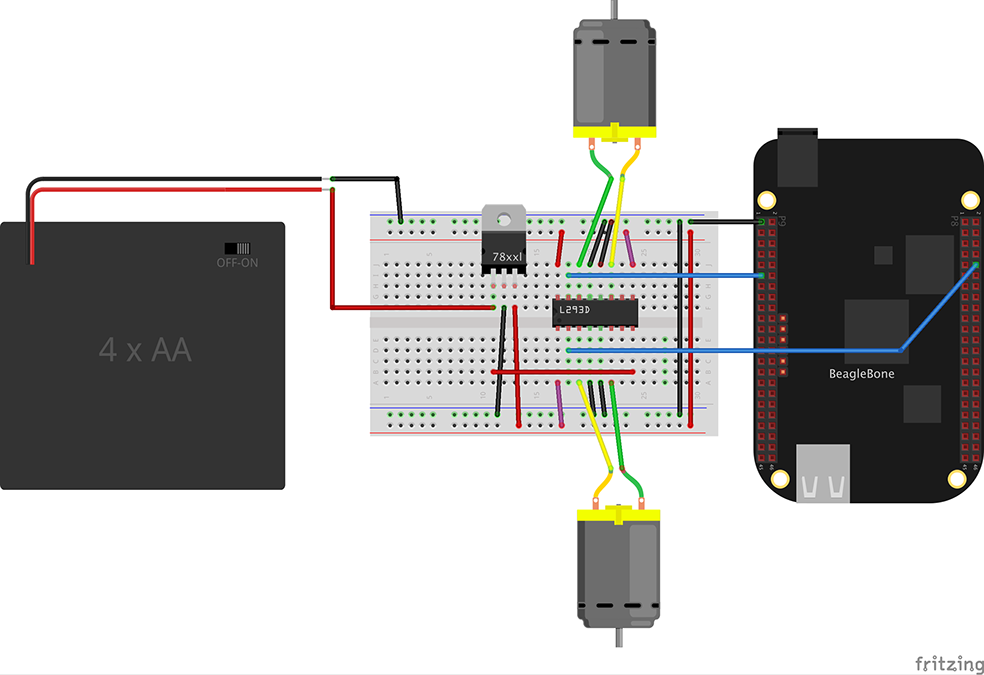
Next attach the motors and L293D motor driver:

Then add the BeagleBone:
Assembling the Robot:
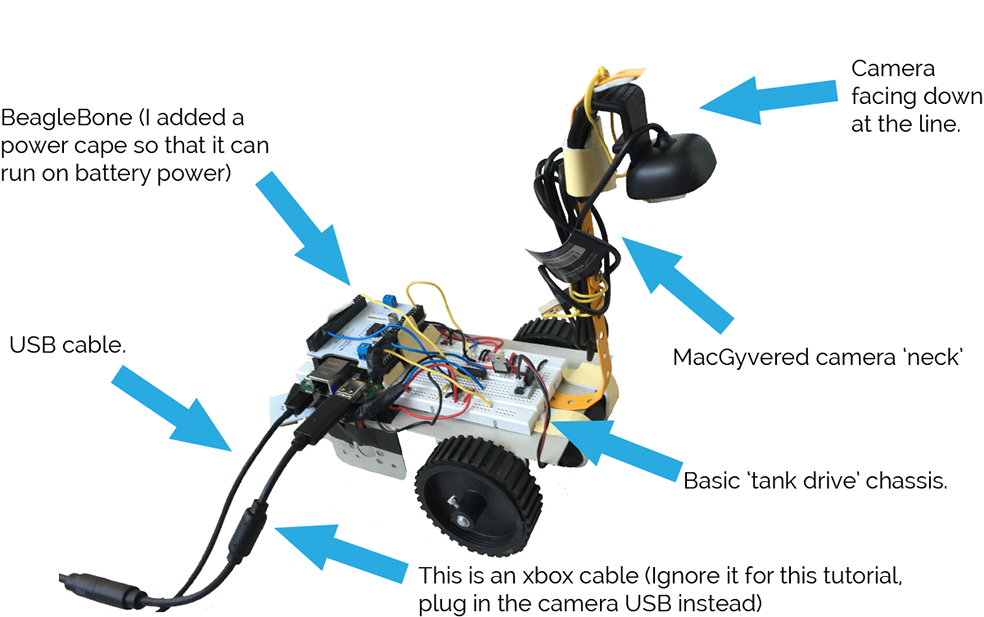
You can use any robot chassis that is based on tank drive (when there are two or more non-turning wheels, and turning is done by spinning one wheel faster then the other). You can either make this yourself or buy a kit.
Writing the Code
Start by plugging in the BeagleBone and ssh into it:
your-computer:~ ssh -X root@192.168.7.2
Now enter the directory:
bone# cd lineFollower
And edit a new file:
bone/lineFollower# nano lineFollower_withMotors.py
Paste this code into the editor [ctrl+shift+v]:
import numpy as np
import cv2
import Adafruit_BBIO.GPIO as GPIO
video_capture = cv2.VideoCapture(-1)
video_capture.set(3, 160)
video_capture.set(4, 120)
# Setup Output Pins
#Left Forward
GPIO.setup("P8_10", GPIO.OUT)
#Right Forward
GPIO.setup("P9_11", GPIO.OUT)
GPIO.output("P8_10", GPIO.HIGH)
GPIO.output("P9_11", GPIO.HIGH)
while(True):
# Capture the frames
ret, frame = video_capture.read()
# Crop the image
crop_img = frame[60:120, 0:160]
# Convert to grayscale
gray = cv2.cvtColor(crop_img, cv2.COLOR_BGR2GRAY)
# Gaussian blur
blur = cv2.GaussianBlur(gray,(5,5),0)
# Color thresholding
ret,thresh1 = cv2.threshold(blur,60,255,cv2.THRESH_BINARY_INV)
# Erode and dilate to remove accidental line detections
mask = cv2.erode(thresh1, None, iterations=2)
mask = cv2.dilate(mask, None, iterations=2)
# Find the contours of the frame
contours,hierarchy = cv2.findContours(mask.copy(), 1, cv2.CHAIN_APPROX_NONE)
# Find the biggest contour (if detected)
if len(contours) > 0:
c = max(contours, key=cv2.contourArea)
M = cv2.moments(c)
cx = int(M['m10']/M['m00'])
cy = int(M['m01']/M['m00'])
cv2.line(crop_img,(cx,0),(cx,720),(255,0,0),1)
cv2.line(crop_img,(0,cy),(1280,cy),(255,0,0),1)
cv2.drawContours(crop_img, contours, -1, (0,255,0), 1)
print cx
print cy
if cx >= 120:
GPIO.output("P8_10", GPIO.HIGH)
GPIO.output("P9_11", GPIO.LOW)
if cx < 120 and cx > 50:
GPIO.output("P8_10", GPIO.LOW)
GPIO.output("P9_11", GPIO.LOW)
if cx <= 50:
GPIO.output("P8_10", GPIO.LOW)
GPIO.output("P9_11", GPIO.HIGH)
else:
GPIO.output("P8_10", GPIO.HIGH)
GPIO.output("P9_11", GPIO.HIGH)
#Display the resulting frame
cv2.imshow('frame',crop_img)
if cv2.waitKey(1) & 0xFF == ord('q'):
break
Next press [ctrl+x] to leave the nano editor. Then press y to answer "yes" and then hit the enter key to save the file.
Now you can run the program with:
bone# python lineFollower_withMotors.py
Now put your robot on the test track and watch it go! If you find that your robot is spinning circles then simply flip the polarity of your motor wires. Here is some footage of my robot following a track:
You can end the program by clicking on the video window and pressing the "q" key or by holding [ctrl+c].
How Does the Code Work?
Lets break down the GPIO code:
Start with importing the Adafruit python GPIO library:
import Adafruit_BBIO.GPIO as GPIO
Now initialize the pins we will use:
#Left Forward
GPIO.setup("P8_10", GPIO.OUT)
#Right Forward
GPIO.setup("P9_11", GPIO.OUT)
To make the robot stop flip both GPIO pins on:
GPIO.output("P8_10", GPIO.HIGH)
GPIO.output("P9_11", GPIO.HIGH)
To make a wheel turn forward you would flip it's GPIO pin off:
GPIO.output("P9_11", GPIO.LOW)
So if the line is too far to the left, you can turn the robot by turning one wheel on and the other one off:
if cx <= 50:
GPIO.output("P8_10", GPIO.LOW)
GPIO.output("P9_11", GPIO.HIGH)
If you are experiencing any errors in your code, you can download my code to your BeagleBone with git:
bone# git clone https://github.com/AlekMabry/BeagleBone-RoverBots.git
If you have any questions or comments, you can contact me here.
Copyright © 2017 Einsteinium Studios